Showing posts with label Stampscapes. Show all posts

Sunday, 6 January 2013

Stampscapes Valentine

Good Morning Girlz!

Here is an idea that I came up with while sucking all of the water out of the basement before the restoration crew got here!  Yes, while I was at the shop yesterday, the hot water tank blew.  Just wonderful.  It now seems that the wiring wasnt done right by the previous owner and that the wiring board had caught on fire as well.  I may have gotten home in time and with shutting down the power and water supply, the small fire went out!  To make a long story short, the other half of the basement that wasnt affected by the water backup last year was affected by the tank.  I am tired and want to move from this possessed house!

Okay.. On to the cards today....


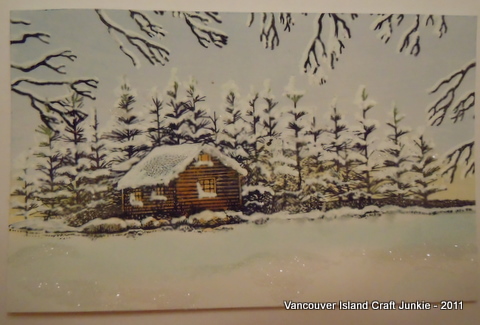
These two Valentines were each done with one stamp for each.  Easy Peasy!!  I used Lakeside Cabin on one and Lakeside Cove on the other.  The Lakeside cove was not quite wide enough so I reinked the stamp and added it to the right hand side, on glossy paper.

The moon was done with a Fiskars heart punch and tacky paper.

To colour, I started with Lemonade around the moon using a Colorbox stylus.  Next, I used Distress Wild Honey around the moon, down through the middle of the scene.  Distress Worn Lipstick was tapped on from the outside edge towards the middle, working around the edges followed by Distress Festive Berries and then Distress Fired Brick.

Now that the colour was how I wanted, I carefully removed the sticky heart moon.  It was stark white so I added Adirondack Lemonade on the edges of the left side.  Now the scene looked like #&@? because the moon was still waayyy too light.  I had nothing to lose so took my VersaMark pad and dragged it across the scene from top to bottom and then covered it with clear embossing powder. (Yes Victoria...I LOVE clear embossing powder!  lol)  The scene was actually dull and bland but the embossing made the colours brighter and a lot richer as well.  I really like how the moon turned out because of this!  The VersaMark dragged some of the colour over the moon and created a slight streaking effect!

Heat embossing looks really neat on glossy paper!  Beware.. keep the heat gun moving because it can look like you are going to start burning it.  This is the result!....


 When putting the layers together I kept the layout simple so your eye will focus on the Valentine moon.  Being that this isnt frilly, it could work wonderfully for a guy card!

Here is the recipe...

Stamps
Stampcapes Lakeside Cabin, Lakeside Cove

Inks
Memento Black
Adirondack Lemonade
Distress Wild Honey, Worn Lipstick, Festive Berries, Fired Brick
VersaMark

Paper
Staples 110 lb, Recollections, Glossy

Brad - ?

Embossing Powder
Ranger Clear

Thanks for looking!

Hugz..
Sheree
 

Thursday, 20 December 2012

Stampscapes Gift Tag


Hi Girlz!

I needed some pretty tags to go with the large Christmas arrangements I made up.  Yes I will post a pic of them in the near future.

I used one stamp... Stampscapes Pine.   The pine was stamped with VersaMark and then I used Ranger, Super Fine Detail embossing powder.  Once the embossing was done I added the moon.  The tag on the left had a small post it circle added right after embossing.  The tag on the right added after I put a very light spritz of ??? Memories gold.  Sorry.. Am having a moment!! 

To finish these off I then added more gold spray.  They look so much prettier IRL.  Too bad you cant see the shimmer!

Lastly I framed the trees with a high gloss gold paper and that was then popped up onto a double layer of white cardstock with the top piece embossed.

The snowflake was from a package of 20 from the Seasonal section in WalMart.

Ta daa!!  Super easy to make a lot.  I must try doing it in different colours!

Have a wonderful Christmas!!

Hugz,
Sheree

Friday, 23 March 2012

Craft A Scene - March - Moonlight


Good Morning Chicks!

My mojo is slowly coming back and I finally had the mindset to work on another Stampscapes scene for the Craft A Scene Blog Challenge for March which is moonlight.

This scene was very easy to accomplish.  I started with four Stampscape stamps (listed below) and then decided to do a monochromatic scene.  It turned out pretty kewl ... I think!  Also, I used a 5X7 size for the card.

To colour the scene I started with a Tim Holtz blending tool with the foam.  Using Memento London Fog I started colouring lightly from the edge moving inward.  It probably took abour five passes around the whole card to get the look I wanted.  Then, using Distress Ink called Black Soot I used the blending tool and once again worked the ink lightly from the outside edge inward until it was dark enough.

I decided that the scene needed a tiny bit of something to add interest so picked up my Colorbox Stylus that had Adirondack Lemonade on the foam pad and without reinking it I tapped a bit of colour into the moon.  Here is a closer look at the photo so you can see what I've done!


Once I mounted the scene it was easy to see that it would look great mounted black on white.  A little bit of scoring around the outside edge and it was done!  After I finished the card I was thinking that a funny sentiment for the inside, that would go with the outside would be... Congratulations on your children moving out!  haha!

I hope you have a wonderful weekend!

Hugs,
Sheree

Stamps:  Stampscape

048E - Lakeside Cove
267E - Pines With Rocks
105E - Cloud With Moon
196F - Pine Tree
Sentiment - Stampscapes - Sentiment Sheet #7

Inks:  Memento London Fog
         Distress - Black Soot
         Adirondack Lemonade Yellow

Paper:  Recollections & Staples 110 lb. white

Thanks for looking!

Challenges:
CAS-ual Fridays - Use a pastel and black
Art Impressions Stamps - Monochromatic

Sunday, 4 March 2012

Stampscapes - Moonlight Tutorial

Good Morning Chicks!

I'm going to walk you through my moonlight scene for the March challenge over at Craft A Scene  I hope you'll be able to follow what I've done in the photos because the lighting isn't the best at home.


Step 1  -  Build the scene

I started by using the Country Stream stamp with Archival Black ink and Hero Arts clear embossing powder.  I find that Hero Arts is nice and fine so works well on detailed images.

Using tacky paper that I bought on a roll from Crafty Capers in Nanaimo I punched out a small 1" circle and stuck it down for the moon.  You will notice that I only did that on one card.

Let the image cool after embossing and then tap in some Lemonade with a ColorBox stylus or sponge tool of your choice.  I have also found that embossing the stamped images can create a kind of frosty effect which you will see in some of final photos.
 

Step 2 - Second Layer of Colour

Sometimes the moon will look white and sometimes it will have a yellow tone.  On this scene it will be yellow.  Due to dye inks fading out I used cantalope on the outer edges to intensify the colour.  I know.. you're thinking that I've got a loose brick upstairs and it's waaay too bright!  Dye inks fade over night so don't worry about it being darker.


Step 3 - Third Layer of Colour

Now we'll add the lightest blue called Aqua around the areas in yellow.  Why?  Well, when I look at the sky, the yellow fades to blue/black.  We'll be colouring over most of it anyway.  I like to add it now because there's no turning back once the darker shades are blended in.


Step 4 - Fourth Layer of Colour

Now doesn't this look horrendous???!!  After I added Stonewashed to the scene I realized that it's time to change now or forever hold my peace!  Never worry that you've ruined it!  Most can be saved by either leaving it in bright sunlight to fade the colour or, add something darker to cover it up!  One nice thing is that we will be going darker and darker so it will be hidden anyway.


Step 5 - Fifth Layer of Colour

This is actually a step for two colours!!  I just noticed that I didn't take a photo prior to adding Pitch Black!!
  
Before adding the black, use Adirondack Stream with the stylus and tap it from the outer edges in.  Don't worry about it looking so dark because it will lighten up beautifully!

Now you can start adding the black!  Oooops!

Are you still with me on this long process??  Now the fun begins!  This time I'm adding Pitch Black which is going to tone down the brights and make it more rich looking...to me anyways!  Tap it on from the outside in.  Be patient and things will come together!


Here is a closer view.  Still kind of looks like @%*# but you never judge a painting before it's done.

Step 6 - Add tree limbs to disguise any boo boo's or as a fill in

When you're finished the colouring, peel the tape off of the moon.  It will look stark white and unrealistic so... grab Lemonade (from the first photo) and tap a bit in around all of the edges.  Next, tap in some Cantaloupe on the left half.  This will give it more dimension!

Next I stamped the oak limb stamp and embossed with clear embossing powder.  I will emboss the stamped images at times to give it a bit more dimension and texture.  You can kind of see that in these photos for once!


Step 7 - Add Highlights

I added highlights with my white paint pen.  Love that thing!  Take care not to overdo it.  Then again, as the dye inks fade a bit, the white highlights blend in a lot more.


And now, here are the scenes mounted.  They look fabulous IRL.  I used Bo Bunny paper which looks stunning and rich.  Prior to mounting I did a wee bit of distressing with Black Soot along the edges.  My camera was not kind once again....  The second photo is actually darker than it shows.


The recipe is....

Stamps:  

Stampscapes - Nature Sheet 1 - Country Stream
Stampscapes - 203G - Oak Branch
Stampin' Up! - Sentiment
Inks..
Adirondack - Lemonade, Aqua, Stonewashed, Stream, Pitch Black
Memento - Cantaloupe
Archival Black
Distress Black Soot
Clear Embossing Powder
Hero Arts White Embossing Powder (Sentiment)
White paint pen
Paper:  BoBunny, Recollections, Staples White

 There you have it!  Have fun creating your own moonlight scene!

Hugs,
Sheree

Challenge Entries For...

Birthday Sundaes - Must have birthday sentiment


Monday, 13 February 2012

Stampscapes - Spring Meadow


Evening Chicks!
Here's a quick post for tonight!   I actually started this Stampscape  couple of days ago.  I've been doing quite a few snow scenes of late and, that's the theme for us over at Craft A Scene for the month of February!  It was pouring rain with wind a few days ago and all I could think about was Spring getting here as fast as possible.  The heavens listened and for three days, including today, we are having sunshine here on the west coast!
I wasn't prepared to give my 'Stamp Eater' a bath today but had to do one with the hose outside.  Poor thing was shaking and cold but, she had found two deep mud holes filled with water and decided that today was the day she'd try and dig to China!  There was water and mud flying all over the place and I'm really not sure how she could put her whole head down in there.. eww!  I'm sure you all know what swampy soil smells like which is why the big goof had to be done with the hose outside.  All is well now.  She started liking me again an hour ago!
Back to the scene!  I stamped this one twice and ended up with one good one.  I'm wishing I would have extended the tree line on the horizon but, it's done and I'm going to put effort into thinking up a new one instead.  I kept the colours (Canadian spelling!)  fairly light, as light as possible.  The initial colouring looked quite dark but, dye inks fade so I left it out on the table and added more colour the following day.  
Once that phase was done I brought out my JellyRoll Star pens and dotted in wild flowers and also added highlights on everything with my white paint pen.
I left the scene on my craft table (should call it a mountain instead) and it lightened up again perfectly!  The lighter colours were quite dull though so I took my stylus loaded with Memento Cantalope and went over everything with it.  What a difference!  The trees popped, the dull rocks looked more rocky and the spring grass looked new, as it should!
Next was mounting, cut an insert to stamp the sentiment on and voila!

The recipe is...
Stamps - Stampscapes!
057G - Meadow Large
196F - Pine Tree (My favourite!)
299B - 3 Rocks And Grass
301A - Rocks And Grass
302A - Gulls

Inks...
Adirondack - Aqua, Mushroom, Meadow, Lemonade, Black, Citrus
Memento - Cantaloupe, Morning Sky, London Fog, Bamboo,
Distress - Frayed Burlap, Crushed Olive

Ribbon - Michaels
Paper - Glossy, Recollections, Costco Jumbo Pack
Crimper

Hope you all have a wonderful work week and I'll post again soon!

Hugs, Sheree

Sunday, 5 February 2012

Stampscapes - On The Inside Looking Out

Morning Chicks!

It's time for a new challenge at Craft A Scene so get your stamps out and join the fun!  The theme for February is Snow... I know, we are all looking forward to Spring now but with this being only our second challenge it's a great time to put snow in the scenes so we can get ideas for next fall when doing Christmas cards or what have you!  (I know you don't like snow down in Auzzieland Shaz but I'll be watching to see what you enter this month!!  And.. No excuses this month Gail!)

I have two scenes to show you today.  The second one will have photos of how the scene looks as it is being worked on.  Actually, I like the second one best of all!  Both are the same but, also very different.  And... Believe it or not. they are done with the exact same stamps but the glossy paper was cut into two different sizes.  Just doing that can change everything!

Scene #1
I had to do some fudging with stamps and taping them off to make everything fit.  The glossy cardstock was cut into six and away I went!  In the end, I only ended up with two of the smaller scenes that were worth keeping.  My rule of thumb is to do at least two identical scenes every time as something always goes wrong.  Some goof ups can be disguised and some are not worth saving.  Keep the wrong ones and use them to try different techniques as you progress be it colour, stamp placement, etc.

The scenes in this post are made up of Stampscapes stamps.  The images were stamped first and the first coat of colour was put on.  I left them overnight as some dye inks fade a bit and added more colour the next day.  A list of colours used will be posted down below.

Snow was added using a white craft paint pen and once that dried I added some MS fine clear glitter here and there to reflect light.
 
Scene #2
As stated above, this scene uses the exact same stamps as above, along with the same colour combinations.  What's different?  Well... This is how it would actually look standing inside the forest looking out to the meadow.  Large fir trees don't allow snow to penetrate to the forest floor for the most part.  I wanted to do something 'outside the box' for this larger scene.  It is mounted, but not on a card yet. It will be a 5 1/2 X 8 inch card and I was having one heckuva time trying to figure out just how to embellish this one to give it some oomphff!! (Yes, that's a word in my personal dictionary!)

Step 1:  Stamp the images on glossy card stock and colour with a stylus.  Leave overnight and add more colour where needed

Step #2:  Add snow using the craft paint pen.

Step #3:  I added clear glitter here and there to show highlights but, also to make it look like there had been a wind when it snowed and the flakes blew onto the tree trunks.
Here is a closeup!

Now... Here is the finished scene mounted!


The recipe for these scenes is...

Stamps:  Stampscapes
087F - Tree Trunk
088F -  Tree Trunk Trio
018E - Cloud Cumulous
299B - Three Rocks and Grass
301A - Rocks and Grass
050E - Lakeside Reflections
192B - Bush Large
272G - Prickly Branches

Inks Used:
Archival Black to stamp images
Adirondack Dye Inks:  Pesto, Latte, Aqua
Memento Dye Inks:  Bamboo, London Fog, Summer Sky
Ranger Distress Inks:  Walnut Stain, Black Soot, Gathered Twigs, Crushed Olive, Shabby Shutters

ColorBox Stylus with foam tips
Glue Pen
MStewart Clear Fine Glitter

Recollections Paper
Staples 110 lb. White Cardstock

There you have it!  Thanks for looking and don't forget to head on over to Craft A Scene to see all of the wonderful challenge entries for February and works of art from our Design Team!  Check out the DT
blogs as well for descriptions and directions for their designs.
Hugs,
Sheree


Challenges I have entered...

Christmas Inspirations - Anything Goes
Christmas Card Challenges- Christmas Card Challenges
Quirky Crafts Challenges - Make A Scene

Wednesday, 4 January 2012

Stampscapes - It's The Little Things

Good Morning Chicks!

Well it's another day of wind and rain here on the island.  Spring just can't get here quick enough now.  I'm getting antsy about working in the mud!

This is a very easy scene I came up with last night.  I actually had six of them done in just over one hour!

First off, I love my little sentiment that says.. it's the simple things, that I purchased from Michelle's Scrapbooking and More web store.  I took the word simple and ran with it!

Everything on this scene was inked with one colour... Distress Walnut (key word - simple).  The distressing was done with the same and then using my nail I roughed up the edges and mounted on dark brown cardstock.  The rest is self explanitory I'd say!  Here's a closeup of the scene itself!


The recipe is:
Stamps - Stampscapes
048E  Lakeside Cove
018E  Columbus Cloud
166A  Row Boat
196F  Pine Tree

Ink - Distress Walnut
Papers - Recollections & Staples
Dots - Dollarama

Thanks for looking and have a wonderful week!

Hugs,
Sheree

Saturday, 31 December 2011

Stampscapes - West Coast Shore - Craft A Scene Challenge #1!


Happy New Year Chicks!

I hope everyone had a safe New Years Eve!  I know I did... painted some more trim moulding and worked on this card!

Today is the first day, of the first challenge, of Craft A Scene!!  It's so exciting!  I can hardly wait to see what scenes everyone will come up with for each challenge.  This will be a learning experience for all of us!

I came up with this scene while playing with a few stamps two nights ago.  I finished the first scene but then touched it with my inked fingertips and ruined it.  Thank goodness I did!!  Out came the stamps again and this time around, I'm a lot happier with the colouring.

When doing a scene, always remember that nothing is ever the same in nature so this means that no scene is ever wrong!  Myself, I'm a realist and have a very hard time coming up with something abstract, or adding images that aren't seen in nature, including choice of colour.  There was a scene I called Raspberry Sunset and that was the wildest thing I've done yet!  Boy do I ever live on the edge!  haha!

There are some very incredible scenes done by well known Stampscape artists out there.  Always take a second and third look because that's how you learn.  Also, when you are out for a walk or on a long drive, look around you at the colours in the sky, depth of field for trees and water... everything!  The more you look, the more you will learn.

Now... Onto this scene!  I only used 3 stamps for this one.  I have coloured the rocks as they would be found on the beach near me.  The jutout of rocks and trees is also coloured as I see them here on the West Coast.  The gulls.. they're just black and used to break up the large sky!

I started colouring with grey and light brown for all of the rocks.  The sky was started with yellow, then very light blue and finally pink for a setting sun.  I have a list at the bottom of this post.  You have probably noticed that my water is a darker blue than most use.  The reason?  Light blue is found in the tropics and darker navy/gray is in the northern hemispere where I reside....the land of igloos!

This is a closeup of the rocks.  I lightened the picture up a bit with Picassa so you could see the different tones.  And rocks are never the same colour throughout either...unless it's granite, marble, slate...you know what I mean.  The salt, minerals, plant life, etc. play a huge part in how the rocks will be coloured in your area so keep your eyes peeled!
I apologize for the quality of this photo.  For some reason, my camera wasn't focusing properly with any of the pics...maybe because I forgot it in the car overnight and it froze??  haha!  Notice the rocks...  More brown near the water's edge because of the mineral content in the water.
I know this scene needs 'something' added but I wasn't sure what.  I would have liked to see more movement in the water but am still experimenting with the 'wave' stamp.  I'm also going to hunt down a dark gray ink pad to add to the light gray that I already own which should mix for the perfect stormy sea colour!
Well... I have rambled on wayyyy too long now!  Here's the recipe!
Stamps:
Stampscape -  207E  -  Pine Island
                      205F  -  Boulders With Lichen
                      302A  -  Gulls
Inks:
Memento - London Fog, Morning Sky, Bamboo
Adirondack - Aqua, Pink Sherbet, Lemonade, Stonewashed, Denim
Ranger Distress - Frayed Burlap, Weathered Wood, Crushed Olive

Paint Pen
Glossy Paper
ColorBox Stylus
Papers:
Stampin' Up!, Recollections, Staples 110 lb. White

Thanks for looking and I wish you everything you could hope for in 2012!

Hugs,
Sheree

Wednesday, 28 December 2011

Stampscapes - Inspiration

Good Morning Chicks!

After seeing the fantastic response to the new Stampscapes challenge blog I went home and played with stamps after work.  I'll be working on scenes for the new blog "Craft A Scene"  Check it out!  The first challenge starts on January 1st!  We now have 24 followers after only two days of being up and running!

I wanted something CAS, along with a calming effect after a whirlwind Christmas Season we've had.  I tried quite a few different scenes and I'm now happy with this one!  I live two blocks from the ocean and have always found watching water has made me lose all thoughts of the hectic atmosphere around me.  I looked through my Stampscape sentiments and saw this one and immediately went to work!


The water stamp is a small section of a huge Seaside Cove.  I think it gives the impression of being way out on the water.  Four stamps were used and here's the recipe!

Stampscapes:
Sentiments Sheet #1
139H  Seaside Cove
302A  Gulls
018E  Cloud Cumulous

Ink:  Big N Juicy - Soothing Sunset
Archival Black
Diamond Stickles to highlight water
Paint pen to highlight gulls

Thanks for looking!
Hugs,
Sheree

Tuesday, 27 December 2011

New Stampscapes Challenge Blog!

Good Morning Chicks!


Well.. my friend Nancy, has been working feverishly putting together a new challenge blog called Craft A Scene and it's now up and running!  I am so proud of the end result and can never thank her enough for all of her time and energy, along with brain power, to set up something so wonderful!

Head on over for a visit.  We are currently looking for Design Team members and followers that will actively participate in challenges, tutorials and more.  I know many of you out there would fit right in and we'd love having your experience and techniques showcased!

Hope you all have a Happy New Year and may you be blessed with health and prosperity in 2012!

Hugs,
Sheree

Tuesday, 13 December 2011

Stampscapes - Winter Dusk

Evening Chicks!

I know.. you are wondering about what kind of goofy title name is that?  Well... dusk comes early in the North Country and this scene is my version of around 3:30 in the afternoon, just before the sun says goodnight until 8 a.m. the following day!  The tones are a bit darker than the previous ones I've been doing, but, snow seems to hold the daylight and even in the pitch black it never seems really dark.  Maybe it's the lights of the city that helps it out where I live!

And.. I know that most of the winter scenes are somewhat similar.  The reason for this is that a tree with leaves on it just isn't realistic in the middle of winter (In Canada that is!).  Some of the pine stamps have the trees looking too simetrical as well.  I am also playing with taping off some of the scene stamps so that the grasses don't show.  There are some prickly grass stamps I definitely will throw in there next time because they look really kewl with snow on them!


This scene uses only 4 different stamps.  The trees were all taped off at different heights with the shorter ones used as filler.  This also makes the tree spacing a little more random as well.  The grass was using one stamp but everything was taped off except for the tips.  Adding snow to the tips helps to disguise everything and makes things look different.
This scene incorporates the mountains stamp as well.  I stamped them using Memento London Fog so that they would appear to be further in the distance and look colder.
Once I finished tapping in the blues and greys for the snow I used my paint pen to add snow to the trees.  Very fine clear glitter was added here and there to show reflection of light off the snow.  TaDa!!

I added a bit more fill light to this photo in Picassa so that you would hopefully see more of the details.  Also, I saved this picture to a larger size so that if you click on the photo you will see that the added snow really isn't that hard to do!  Nothing is the same or even in nature.  Not one tree branch supports snow in the same way...so.. adding snow must be done randomly.  I use dashes and dots all over the place. 

This next photo shows where I put some of the glitter for highlights.
 

The recipe is....
Stamps:
Stampscape
188F  Rocky Peaks
192B  Bush Large
267E  Pines and Rocks
207E  Pine Island

Sentiment - Cornish Heritage Farms

Inks:
Adirondack - Lemonade, Aqua
Memento - London Fog, Morning Sky, Bamboo
Distress - Gathered Twigs

Glossy Paper
Unknown and Recollections white and black
Paint Pen

Thanks for looking!

Hugs,
Sheree

Saturday, 3 December 2011

Stampscapes - Lakeside Christmas

Good Evening Chicks!

I've been playing with winter scenes again tonight and this is what I ended up with.  I decided to use the Lakeside Cabin stamp because I know so many that have it.  This isn't as nice as the random scenes but turned out not too shabby.  The scotch pines on this stamp are a little trickier to add snow to than the fir trees on stamps that go with Lakeside Cove.

Now I'm going to try and show you how I ended up with this scene using only two stamps!
This first photo shows you the stamps as you will recognize them...
Before I stamped the Lakeside cabin I taped off the water reflections but left the rocks showing on the shore.  Even in the high country of the rockies you'll see less snow along the waters edge...depending where you are.  On the ocean.. you'll really see the rocks and there's more snow coverage as you move away.  The tree branches framing the scene are done with Spooky Branch.  I like the Bare Branch stamp better but don't have that one yet!
The cabin was coloured using Distress Gathered Twigs and Cantalope.  The sky was acheived using Memento Summer Sky and Adirondack Lemonade tapped along the horizon.  The look of cold snow and drifts pop with Adirondack Aqua and Memento London Fog.

Now, here's the snow!!

To put snow on the trees, roof, and rocks I used a Uniball White Paint Pen.  Nothing else works like them.  There's no blobs or thick lines.  With this pen you actually have to keep colouring with it but, if you want fine lines or dots.. there's nothing like it!
Once the snow was added I used MS clear fine glitter to accent the snow on the lake, the cabin roof and on some tree limbs.
Once you mount it... it looks much better!  Here is a closer look at where the glitter was added.  One more tip... I used my glue pen for snow.  It dries clear but goes on light blue.  All of the craft stores have them and with the ball point tip you can add as little or as much as you like!
Now... here's the card mounted.  I was going to add snowflake embellishments arount the edge but that took away from the scene.


Thanks for looking and I hope you all have a wonderful weekend!

Hugs,
Sheree

Challenge entry for
Gingerloft - Winter or Christmas

Friday, 25 November 2011

Stampscapes Christmas - After The Snow!

Howdy Chicks!
First... Hope my friends in the USA are having a wonderful Thanksgiving Holiday
Second... What a week!  I'm losing things that are right in front of me.  The dogs don't need extra exercise because they follow me from room to room, doing the same circuit 20 times looking for the thing that's lost, right in front of me!  Don't laugh youngin's!  One day you'll find out!  Saying a prayer to the big guy won't help because it's Mother Nature playing around with your head!!
I went in to the shop today to get some information compiled for Revenue Canada (eegad!).  The shop wasn't as busy which meant that Pearl (my Mexican monster) wasn't being fed her quota of treats from adoptive parents so... while I'm compiling info for the government... Purl is standing up at the back of my office chair and actually hitting me in the head with her paw because I put her on ignore.  I Defintely wasn't feeling the love!
The carpet layers came this morning.  All they did was skim the basement floor twice and will be back Saturday morning to install the carpet and new vinyl which also should have been done today!  Another day that will send me in circles.  Hope I don't get too dizzy!!

Here's my post!
I've been trying to come up with a Christmas card using Stampscapes that is not only easy, but looks pretty kewl too!  Here's the end result and I'm pretty happy with it!   The sky isn't grey and stormy like my earlier ones.  To me, being a Prairie Girl (back when dinosaurs roamed the earth), this is what the sky looks like after a big dump of snow.  The sky was lightened somewhat with Adirondack Lemonade along with a touch into the snow.
I added some extra fine crystal glitter that I bought when the dinosaurs roamed the earth and when MS started putting things in Michaels.  That's probably before most of you were born, or even thought of! 
Here's a close up of the glitter!
Hope you can make it out!
Here's the recipe!

Stamps -
Stampscape
267E  Pines and Rocks
207E  Pine Island
289D  Fence
192B  Bush

Inks -
Adirondack:  Lemonade, Aqua
Memento: Morning Sky, Black, London Fog, Bamboo
Distress:  Walnut

Papers -
Background:  Bo Bunny
Solids: Misc unknown
Glossy White

White paint pen
Crystal glitter fine
Glue pen

Thanks for looking and I hope you all have a wonderful weekend!

Hugs,
Sheree


Friday, 18 November 2011

Stampscapes - Last Catch Of The Day


Good Evening Chickees!

This Stampscapes card started out as a tutorial.  I took pictures every step of the way.  When I went to post everything... the photos only showed up in the download as an icon!  So.. I'll be trying another one and hopefully it won't screw up as well haha!
This birthday card is for my hubby's ex-wife's father who is the funniest person on the planet!  Also, I will be entering it in The Outlawz Monday Greeting Card Challenge and the theme is for men/boys.
I sized this card to fit in a standard envelope that I use in the office.  Thought I'd do something different that the standard 5X7 or 4X5.  Turned out pretty kewl!

The recipe is as follows:

Stamps:
Stampscapes
050E  Lakeside Reflections
048E  Lakeside Cove
267E  Pines and Rocks
040B  Geese in Flight
166A  Row Boat
Sentiment
Stampin' Up!
Paper:  Recollections, BoBunny Forever Fall Foliage
Inks: 
Archival Black
Distress:  Frayed Burlap, Gathered Twigs, Persimmons
Big n Juicy Foliage
Versa Mark

Clear Embossing Powder
Gold Embossing Powder
White Paint Pen

Thanks for looking and have a wonderful weekend!

Hugs,
Sheree

Saturday, 12 November 2011

Stampscapes - Raspberry Sunset

 
Good Evening Chickees!
I was wracking my brain trying to think of a card to submit to the Outlawz Color Challenge that also has a twist!  We had to use the colors shown below and also add plaid or houndstooth paper.  Yikes!  I had neither in colors that would coordinate with the challenge colors so made my own with a plaid stamp. 
Things came together when I pulled out my Stampscape stamps!  The sunset is mainly Raspberry and the white is used to frame the scene.  The scene was stamped in black.  I also used some other colors to  bring it to life. 
 
First off, I brayered the background starting with Pink Sherbet and then darkened everything with Raspberry and then Wild Plum.  The stamped images were then added using Memento Tuxedo Black.  This time around I didn't stamp a test scene on scrap paper first and you can tell.  The rocks at the bottom of the stamps don't line up as well as they should so it doesn't look as natural.  Oops... better luck next time!
 
To add some depth and hints of color I used a stylus.  First off I went  back to the Wild Plum and framed the edges of the brayered scene, blending in the darker edges. Memento Black was used along the outer edges to give the illusion of an evening scene.  I blended in some Lemonade to the lower edges of the sky along with parts of the water.  Frayed Burlap was used on the rocks and then topped off with Weathered Wood on the water.
 
Here's a close up view of the trees and sky showing where I put the white highlights!  It doesn't show tooooo well so grab your magnifying glass and do some squinting exercises! 
 
 
Here's the recipe!

Stamps:
Background - Impression Obsession - Gingham
Stampscapes - 267E  Pines and Rocks
                       207E  Pine Island
                       175A  Paddlers
                       302A  Gulls
Inks:
Memento - Tuxedo Black
Adirondack Dye Ink - Pink Sherbet, Raspberry, Wild Plum, Lemonade
Distress Inks - Weathered Wood, Frayed Burlap
White Paint Pen
Brayer and Stylus

Thanks for looking!

Hugs,
Sheree

Tuesday, 8 November 2011

Stampscapes Christmas

Afternoon Chickees!
Here is a Stampscape that I played around with a week ago and am just getting to post it now.  The papers are from last year's stash but the Spellbinder is new for me.  I thought this shape showed this scene of better than the next card shown.  I thought Christmas lights would look kind of kewl on the fence but the bulbs are a bit big... maybe they are 60 watts each!  Hmm... good thing I won't have their hydro bill!  There's only two stamps used on this.  If I remember correctly, the one is Pine and Rocks that I taped off along with Crooked Fence taped off and stamped crooked to level the wire lines.


This Christmas card is done using the Lakeside Cabin Stampscapes stamp and the crooked fence.  I used painter's tape to mask off for snow and used a Jelly Roll pen for the lights. And.... I goofed on this one!  May have to give it to my brother or one of my left-handed boys!!  Seems put the top layers on the card backwards so it now opens from the left.  They'll laugh like heck when one of them gets it! 

Inks used:
Adirondack Dye Ink Pads:  Aqua
Memento Dye Ink Pads:  London Fog, Black, Bamboo
Distress Ink Pads:  Frayed Burlap, Walnut

Thanks for looking!  I hope to find some winter scenes on the net so I can try something different.

Hugs,
Sheree

Saturday, 1 October 2011

Three Different Looks From The Same Stamps

Hi Everyone!
I made these scenes up the other night and finally had them matted Friday night.  I used the same stamps on all three and some of the stamps are in the same spots.  There are different moons in two and one had a major accident so I trimmed it down to fit on a 4 1/4 X 5 1/2 card! 
Each scene was very dark when it was finished.  The white penned highlights really showed up beautifully.  Then... over two days they faded (Adirondack Dye Inks will do that).  I kind of like how they turned out after all!
Here are the finished projects!

This is the first scene.  The reflection of the moon was quite vivid at first so I was very happy with that in the end as it wasn't so overpowering.  The moon was taped off so that it would fit on the horizon.


This is the same scene but I had an accident on the right side so trimmed it down to fit on a smaller card.  It was like the first photo in the beginning which would fit into a business size envelope.  I didn't put a moon in this scene so the sky wasn't as dark in the beginning.  That is why it is lighter than the other one above.


I really like this one and it looks so much better in real life!  Before it faded, the sky was dark and I had done the reflections of the windows perfectly in the water.  Now, you can hardly tell!  The card is 5X7 and was a different size to use up the leftover glossy paper.
 
Stamps used:
Stampscapes
Lakeside Cabin
Pines and Rocks
Rocks and Bushes
Paddlers
Row Boat
 
Inks:  Adirondack Aqua, Stream, Lemonade, Stonewashed
         Memento Sunshine Yellow, Morning Sky, London Fog
 
Thanks for looking and... Have a wonderful weekend!!
 
Hugs,
Sheree

Tuesday, 20 September 2011

Stampscapes - Autumn Sunset

Good Afternoon!
What a fun day today.  I skipped from work (I'm the boss) and stayed home to do more painting on the house before the rain and wind sets in tonight.  So... while I cook dinner I thought I'd post this card that I made two days ago for one of my clients.
Jerry came up to Campbell River last Friday to attend a funeral and near the end of the funeral his sister had to rush him to the hospital because he couldn't move his left arm.  Turns out he had a stroke due to bleeding on the brain.  To make a long story short, I thought we were going to lose him but... my Korean Veteran started coming around!  He is still paralized on his left side but we are hoping that when the pressure on the brain slowly goes away he will regain use of his left appendages.  I'm thinking positive!
I put this card together because Jerry was a commercial fisherman after the war and he would go fishing today but his body is slowing down which makes it hard to launch a boat.  He just LOVES fishing!
There are two sentiments on the inside of the card.  One is 'Get Well Soon' from Stampin' Up! and the other is one from Stampscapes.  I embossed all images with clear embossing powder, doing each one as it was stamped.  The background was brayered with a 'Big and Juicy' pad and then Raspberry at the top to intensify the colour a wee bit more.  Only one print was used for background paper.  I was inspired by the colours in the maple leaves which  don't really show well.
Here is the recipe!
Stamps - Stampscapes & Stampin' Up!
302A - Gulls
266D - Tree cluster
195G - Pines and Rocks
048E - Lakeside Cove
166A - Rowboat

Archival black ink, Big and Juicy, Adirondack Raspberry Dye Ink

Paper - Glossy, Bazzil, Staples 110 lb. white, Indian Summer - Aspen - Basic Grey

Rubber brayer
White pen for highlights
Marth Stewart photo corner punch

Thanks for looking and may you have the most wonderful week!

Hugs,
Sheree

Challenges:
Cards for Men - Anything but square
Oldie But A Goodie - One For The Boys