Showing posts with label Christmas. Show all posts

Sunday, 13 January 2013

Bugaboo Stamps Challenge at The Outlawz

Good Evening Girlz!

The Greeting Card Challenge at The Outlawz for the week of January 14th.  I am posting a couple of hours early but it has been a crazy schedule lately.

The Bugaboo digi that I picked for this weeks challenge is..Gus and I just love this cranky old guy!   This will be used as a Christmas card for one of our loggers this year.

One of the extras needed for this challenge is snow or snowman.  I picked snow for mine.


Here is a close up of the snow and glitter I added..
 
 
The recipe is...
 
Stamps - Bugaboo Digi
Memory Box Die - Grand Window
Papers - Recollections and unknown
MS Score board
Distress Ink Frayed Burlap
MS Clear Glitter
Snow
 
Thanks for looking!
 
Hugz,
Sheree


Thursday, 20 December 2012

Stampscapes Gift Tag


Hi Girlz!

I needed some pretty tags to go with the large Christmas arrangements I made up.  Yes I will post a pic of them in the near future.

I used one stamp... Stampscapes Pine.   The pine was stamped with VersaMark and then I used Ranger, Super Fine Detail embossing powder.  Once the embossing was done I added the moon.  The tag on the left had a small post it circle added right after embossing.  The tag on the right added after I put a very light spritz of ??? Memories gold.  Sorry.. Am having a moment!! 

To finish these off I then added more gold spray.  They look so much prettier IRL.  Too bad you cant see the shimmer!

Lastly I framed the trees with a high gloss gold paper and that was then popped up onto a double layer of white cardstock with the top piece embossed.

The snowflake was from a package of 20 from the Seasonal section in WalMart.

Ta daa!!  Super easy to make a lot.  I must try doing it in different colours!

Have a wonderful Christmas!!

Hugz,
Sheree

Distressed Masculine Birthday Card


I did this quickly for my sons birthday last weekend.  I was so engrossed with getting everything ready for he dinner that I forgot the card..oops!  So, I pulled out the Tim Holtz Gears die and cut them out on grey Stampin Up! cardstock.  The gears were distressed with Walnut, Gathered Twigs and Black Soot.  I swiped my VersaMark pad over the gears and piled on the clear embossing powder.  The last thing was to sprinkle some Zing black embossing powder heavy in some spots and then heavy in others.  Here are a couple of close ups so you can see what I have done...


I think the gears turned out pretty neat!
You can see how I popped the smaller one up along with the one below.

The background is a Cuttle Bug folder and a dull silver paper.  After I embossed it I dabbed a bit of black VersaFine ink onto a paper towel and lightly went over th embossing to make it look  bit aged...like a worn toolbox!  I find that this ink dries a bit quicker if you want to do something else with the paper.

There you go!

Thanks for looking!  I hope you have a wonderful Christmas Holiday!

Hugz,
Sheree

Monday, 10 December 2012

Distressed Cricut Tags

Evening Chicks!

When I use the Memory Box dies and others to do different projects, some of my wonderful friends dont have the dies but like to use the Cricut.  Soooo.. I pulled out the Christmas Cheer cart and found kewl images that resemble Tim Holtz ones.   Ooops, the fence is a die cut but the trees aren't!  I will post another one using the snowman from the same cart in a day or two.

My tags are nowhere near the super kewl level that Tim's are but, I am trying!  It is hard to tell but the trees are embossed with the CBug and lots of clear embossing powder dumped on after!


The recipe is:

Tags - From our shop
Trees - Cricut Christmas Cheer cart
Snowflakes - WalMart pack of 20 for super cheap!
Fence - Memory Box die
Ribbon - Not sure - My stash
Distress Inks - Gathered Twigs, Wild Honey, Peeled Paint, Evergreen Bough, Forest Moss
Perfect Pearls Spray - Copper
Ribbon - Stash
Embossing Powder - Clear...Lots of it!

Thanks for looking!

Huggzz...
Sheree
p.s.  I will be back playing with Stampscapes again after the holidays.  I will be able to wrap my head around them when things slow down a bit!

Tuesday, 13 December 2011

Stampscapes - Winter Dusk

Evening Chicks!

I know.. you are wondering about what kind of goofy title name is that?  Well... dusk comes early in the North Country and this scene is my version of around 3:30 in the afternoon, just before the sun says goodnight until 8 a.m. the following day!  The tones are a bit darker than the previous ones I've been doing, but, snow seems to hold the daylight and even in the pitch black it never seems really dark.  Maybe it's the lights of the city that helps it out where I live!

And.. I know that most of the winter scenes are somewhat similar.  The reason for this is that a tree with leaves on it just isn't realistic in the middle of winter (In Canada that is!).  Some of the pine stamps have the trees looking too simetrical as well.  I am also playing with taping off some of the scene stamps so that the grasses don't show.  There are some prickly grass stamps I definitely will throw in there next time because they look really kewl with snow on them!


This scene uses only 4 different stamps.  The trees were all taped off at different heights with the shorter ones used as filler.  This also makes the tree spacing a little more random as well.  The grass was using one stamp but everything was taped off except for the tips.  Adding snow to the tips helps to disguise everything and makes things look different.
This scene incorporates the mountains stamp as well.  I stamped them using Memento London Fog so that they would appear to be further in the distance and look colder.
Once I finished tapping in the blues and greys for the snow I used my paint pen to add snow to the trees.  Very fine clear glitter was added here and there to show reflection of light off the snow.  TaDa!!

I added a bit more fill light to this photo in Picassa so that you would hopefully see more of the details.  Also, I saved this picture to a larger size so that if you click on the photo you will see that the added snow really isn't that hard to do!  Nothing is the same or even in nature.  Not one tree branch supports snow in the same way...so.. adding snow must be done randomly.  I use dashes and dots all over the place. 

This next photo shows where I put some of the glitter for highlights.
 

The recipe is....
Stamps:
Stampscape
188F  Rocky Peaks
192B  Bush Large
267E  Pines and Rocks
207E  Pine Island

Sentiment - Cornish Heritage Farms

Inks:
Adirondack - Lemonade, Aqua
Memento - London Fog, Morning Sky, Bamboo
Distress - Gathered Twigs

Glossy Paper
Unknown and Recollections white and black
Paint Pen

Thanks for looking!

Hugs,
Sheree

Outlawz CAS Entry - Child's Card

Evening Chicks!

This is my entry into this week's Sunday CAS Challenge at The Outlawz.  I cut out the polar bear with the Cricut and mounted him on ripped white with stickles on the edge and stamped snowflakes on the  blue background.  What a super fast card!   It is going to be sent to my cousin's grandson Dawson who will be 5 this month.  Hope he likes it!

The theme for this week's challenge is Glitter It On!  I used stickles on my card to accent the snow and snowflakes along with his scarf.

Thanks for looking and I hope everyone is having a wonderful week!
Hugs,
Sheree

Saturday, 3 December 2011

One Cut... Three Wreaths!

Evening Chicks!

I now have a table in my 'Rubber Room' so have the Cricut set up to play with now!  WooHoo!!
I used one of the Christmas Carts and cut out the wreaths, first on white paper to play with.  This wreath above is first cut in a gold shimmer paper.  Some of the leaves are glued and have applied micro fine glitter from Glitter Ritz.  I goofed on this one and the shadow cut (brown) was stuck on upside down making the leaves go the wrong way....ooooops!  I kind of like how it turned out tho'!
This wreath was cut out in a very light aqua and then used the new Glitter Ritz colour Iced Mint I think it is.  Added sprigs of branch done with a MS punch.  The background was embossed.  Pearls were from the dollar store.
I've saved the best for last!  This is the one I love.  The background paper is a very light aqua and I'm not sure but it could be from Stampin' Up! years ago.  Once again I popped up parts of the leaves where the vein cuts were to give it dimension.  Spriggs of branch done with the MS punch and small white flowers from Michaels in the wedding section.  The sentiment is by Flourishes and the second half of it is stamped inside.... It's time for Mistletoe and Holly!
Thanks for looking and have a wonderful weekend!
Hugs,
Sheree

Stampscapes - Lakeside Christmas

Good Evening Chicks!

I've been playing with winter scenes again tonight and this is what I ended up with.  I decided to use the Lakeside Cabin stamp because I know so many that have it.  This isn't as nice as the random scenes but turned out not too shabby.  The scotch pines on this stamp are a little trickier to add snow to than the fir trees on stamps that go with Lakeside Cove.

Now I'm going to try and show you how I ended up with this scene using only two stamps!
This first photo shows you the stamps as you will recognize them...
Before I stamped the Lakeside cabin I taped off the water reflections but left the rocks showing on the shore.  Even in the high country of the rockies you'll see less snow along the waters edge...depending where you are.  On the ocean.. you'll really see the rocks and there's more snow coverage as you move away.  The tree branches framing the scene are done with Spooky Branch.  I like the Bare Branch stamp better but don't have that one yet!
The cabin was coloured using Distress Gathered Twigs and Cantalope.  The sky was acheived using Memento Summer Sky and Adirondack Lemonade tapped along the horizon.  The look of cold snow and drifts pop with Adirondack Aqua and Memento London Fog.

Now, here's the snow!!

To put snow on the trees, roof, and rocks I used a Uniball White Paint Pen.  Nothing else works like them.  There's no blobs or thick lines.  With this pen you actually have to keep colouring with it but, if you want fine lines or dots.. there's nothing like it!
Once the snow was added I used MS clear fine glitter to accent the snow on the lake, the cabin roof and on some tree limbs.
Once you mount it... it looks much better!  Here is a closer look at where the glitter was added.  One more tip... I used my glue pen for snow.  It dries clear but goes on light blue.  All of the craft stores have them and with the ball point tip you can add as little or as much as you like!
Now... here's the card mounted.  I was going to add snowflake embellishments arount the edge but that took away from the scene.


Thanks for looking and I hope you all have a wonderful weekend!

Hugs,
Sheree

Challenge entry for
Gingerloft - Winter or Christmas

Friday, 25 November 2011

Stampscapes Christmas - After The Snow!

Howdy Chicks!
First... Hope my friends in the USA are having a wonderful Thanksgiving Holiday
Second... What a week!  I'm losing things that are right in front of me.  The dogs don't need extra exercise because they follow me from room to room, doing the same circuit 20 times looking for the thing that's lost, right in front of me!  Don't laugh youngin's!  One day you'll find out!  Saying a prayer to the big guy won't help because it's Mother Nature playing around with your head!!
I went in to the shop today to get some information compiled for Revenue Canada (eegad!).  The shop wasn't as busy which meant that Pearl (my Mexican monster) wasn't being fed her quota of treats from adoptive parents so... while I'm compiling info for the government... Purl is standing up at the back of my office chair and actually hitting me in the head with her paw because I put her on ignore.  I Defintely wasn't feeling the love!
The carpet layers came this morning.  All they did was skim the basement floor twice and will be back Saturday morning to install the carpet and new vinyl which also should have been done today!  Another day that will send me in circles.  Hope I don't get too dizzy!!

Here's my post!
I've been trying to come up with a Christmas card using Stampscapes that is not only easy, but looks pretty kewl too!  Here's the end result and I'm pretty happy with it!   The sky isn't grey and stormy like my earlier ones.  To me, being a Prairie Girl (back when dinosaurs roamed the earth), this is what the sky looks like after a big dump of snow.  The sky was lightened somewhat with Adirondack Lemonade along with a touch into the snow.
I added some extra fine crystal glitter that I bought when the dinosaurs roamed the earth and when MS started putting things in Michaels.  That's probably before most of you were born, or even thought of! 
Here's a close up of the glitter!
Hope you can make it out!
Here's the recipe!

Stamps -
Stampscape
267E  Pines and Rocks
207E  Pine Island
289D  Fence
192B  Bush

Inks -
Adirondack:  Lemonade, Aqua
Memento: Morning Sky, Black, London Fog, Bamboo
Distress:  Walnut

Papers -
Background:  Bo Bunny
Solids: Misc unknown
Glossy White

White paint pen
Crystal glitter fine
Glue pen

Thanks for looking and I hope you all have a wonderful weekend!

Hugs,
Sheree


Monday, 21 November 2011

Wrapping It Up!

Evening Chickees!
First off.. the photo makes the bright red look coral.  Oh well.. you get the picture!  IRL this definitely looks like a Christmas card!
This is an entry to this week's The Outlawz Monday Greeting Card Challenge.  It was fast and easy to make with papers from last years stash.
Paper:  Basic Grey
Ribbon:  Sheer olive - WalMart
Frayed Burlap Distress ink pad
Clear embossing powder
 
Thanks for looking and have a wonderful work week!!
Hugs,
Sheree

Sunday, 13 November 2011

All That Glitters!

Good Evening Chickees!
 
After spending hours scraping rubber backed carpet from the stairs that the previous owner was too lazy to do before putting down laminate flooring, (smells like rotten feet!), I decided to check what this weeks requirements were for The Outlawz CAS Sunday Challenge.   This week we are to use our favourite paper and even though I have a huge selection of different faves... my ultimate is glitter paper!  I have sheets of it in the rolling cabinet and they are sooo pretty that I always tend to save them for something special.  Well... after two years of sitting on them I decided to USE them!  Also, I used a shimmer paper for the background that I've been saving as well.  Anxiety pains are happening.. what will I do now that I've taken a chunk out of each??!!
 
This was an easy card to make.  I brought out the Spellbinder ornaments dies and found that they cut through that thick paper with ease.  I found some CB edge folders that I haven't used so tried them on the ornaments.  The lighter ones show nicely but the larger one can be seen with that trusty old magnifying glass!  Pop dots in two thicknesses (sp?) lifted them up for more definition.  CAS cards shouldn't have too much on them but they looked so boring flat against the background.  Last was a jellyroll pen to draw in the ornament wires because my gold thread is MIA.
 
Thanks for looking and hope everyone has a wonderful work week!
 
Hugs,
Sheree  

Thursday, 10 November 2011

Black & Gold Christmas

Good Evening Chickees!!
I finished my card tonight that I'm entering into the Outlawz Wednesday Sketch Challenge.  Now that you've seen what I came up with, I will show you  the sketch I tried to follow...
This card was fairly easy to put together other than trying to figure out the measurements late at night after a 4 a.m. start this morning.  I must admit that my mojo is working a wee bit better tonight!  Could it be the lack of sleep the last few days??
Here's the recipe!
Stamp - Inkadinkadoo
Ink - Versafine black
Clear embossing powder
Paper - Prints are Graphic 45 and the Gold shimmer from Crafty Capers and the Black - Recollections
Bling

Thanks for looking and don't forget to join us at The Outlawz !! 

Hugs,
Sheree

Wednesday, 9 November 2011

Another Distress Christmas Card/Tag

 Good Afternoon Chickees!

I started this the other night and remembered to take a picture of it last night!

I'm on a distressing kick (a newfound kick) and here's another creation.  The snowflakes are embossed and I used Tim Holtz crackle and Distress Stickles to add some fun to the distressed ink colours.

Here is a side shot of the tag.

 Here is a shot of the back of the tag.

Someone I know well is going to receive this card for Christmas.  She's a 'lurker' and hopefully won't figure out I'm talking about her!  haha!


 The recipe is as follows:

Distress Inks.. Broken China, Something Glass lol, Frayed Burlap, Walnut, Honey
Snowflake stamp... I'll get back to ya!
Sentiment Stamp... Inkadinkadoo
Blue Distress Stickles
White embossing powder
Versa Mark
Ribbon & Wool


Thanks for looking!

Hugs,
Sheree

Tuesday, 8 November 2011

Stampscapes Christmas

Afternoon Chickees!
Here is a Stampscape that I played around with a week ago and am just getting to post it now.  The papers are from last year's stash but the Spellbinder is new for me.  I thought this shape showed this scene of better than the next card shown.  I thought Christmas lights would look kind of kewl on the fence but the bulbs are a bit big... maybe they are 60 watts each!  Hmm... good thing I won't have their hydro bill!  There's only two stamps used on this.  If I remember correctly, the one is Pine and Rocks that I taped off along with Crooked Fence taped off and stamped crooked to level the wire lines.


This Christmas card is done using the Lakeside Cabin Stampscapes stamp and the crooked fence.  I used painter's tape to mask off for snow and used a Jelly Roll pen for the lights. And.... I goofed on this one!  May have to give it to my brother or one of my left-handed boys!!  Seems put the top layers on the card backwards so it now opens from the left.  They'll laugh like heck when one of them gets it! 

Inks used:
Adirondack Dye Ink Pads:  Aqua
Memento Dye Ink Pads:  London Fog, Black, Bamboo
Distress Ink Pads:  Frayed Burlap, Walnut

Thanks for looking!  I hope to find some winter scenes on the net so I can try something different.

Hugs,
Sheree

Send A Smile 4 Kids

Good Morning!
Just thought I'd share some of the cards I've been making to send to Send A Smile 4 Kids who in turn package them up and deliver them to Children's Hospital in Vancouver. 
I'll be adding to the pile for the next week and then ship them off!

The glitter cards below were messy but fun to make!  I think I have glitter throughout the house, all over my dogs and lining the washing machine!!  Really felt like Christmas with all the sparkly stuff around!
The octopus and seahorses are made to wiggle.  I had some thin wire ribbon that I coiled around a pen and adheared it with Glossy Accents.  The stamps and paper are 'Recollections.'


I love Penny Black and I used her stamps for the Hedgies and Pup.  The paper is from last year. 


Thanks for looking!!

Hugs,
Sheree

Saturday, 29 October 2011

Quick and Easy Christmas Card

I came up with this idea after figuring out I'd need a slew of Christmas cards this year to send to our customers at the shop.  Each card only took a couple of minutes and IRL... they look really kewl!  The lighting in the dining room wasn't cooperating and my photog skills don't show this off well at all but here goes!


I used a brass stencil for this and coloured it with a large stippling brush.  Starting with Adirondack Dye Ink Aqua, stipple all over.  Next stipple on Adirondack Pool to the outer edges and work inward.  The last step is to stipple on Adirondack Dye Ink Stream to the outer edges. 

I thought it needed a bit more sparkle so used some Smooch!  perfect!  The cardstock is Staples 110 pound and scored 1/4 inch around the image.  Sentiment is stamped in Turqouise from Stampin' Up! and heat embossed.  Voila!

Have fune trying something like this.  I'm going to experiment with other colour combinations as well.

Have a wonderful weekend!
Hugs,
Sheree


Tuesday, 25 October 2011

Distressed Christmas (The ink kind!!)

Hi Everyone!

The title almost sounds like I'm sending out an SOS! 
This card was fun to make and I played and learned at the same time.  I started with cream paper and first stamped the background stamp in Distress Walnut.  After the stamp was covered in ink I dabbed a paper towel here and there to create blotches.  The next step was to distress the paper and use my deckled scissors to jag the edge.  Once again it was distress on the front and back of the cut edges.  Looked pretty neat so sprayed some Smooch to give it a hint of glisten.
The rest of the card was easy and the longest part was playing with the layout so everything would fit!  It looks sooooo much better IRL!  The corners are actually squared but don't look it because of my fab photography skills again!

Here's the recipe

Stamps - Greeting - Unknown; Background Stampendous?  (Help Victoria!)
Inks - Distress Frayed Burlap, Walnut; Stampin' Up! Bravo Burgandy
Pointsettia (one from an old container I picked up from Michaels a couple of years ago.)
Pop dots
Smooch

Thanks for looking!

Hugs,
Sheree

Thursday, 6 October 2011

Distress Christmas Card

Once again my photography skills are showing how bad I really am on 'automatic'!!
This card came to me while playing with Distress Inks and  Ranger Perfect Pearls.  This card stock really started out as plain white!  Kind of looks like I was taking out my agressions on the paper!   
The background stamp is stamped in Frayed Burlap along with the Flourish.  Perfect Pearls Bronze was dusted onto the Flourish and the excess dusted off.   Next was that awesome sentiment which was stamped with Gold Brilliance and embossed with gold embossing powder.
The snow flakes were stamped with Frayed Burlap and dusted with Gold Perfect Pearls. 
I added more light to this photo so that the perfect pearls would stand out a bit more for you to see.  The card looks like #*%! in the photo but, IRL... It's not too shabby.  Victoria said it looks like store bought and classy... I love Victoria  :o) j/k
The Recipe:
Stamps:
Background - Penny Black Letter Background
Flourish - Stampendous! Jumbo Dahlia set  (Love this set!!)
Sentiment - Inkadinkado
Snowflakes - Penny Black
Inks:
Distress - Fired Brick, Frayed Burlap, Walnut
Memento - Rhubarb
Perfect Pearls
Bling - Dollarama
Thanks for looking!
Hugs,
Sheree
That's about it other than adding a wee bit of bling!

Seasonal Distressed Tags - Something New For Me!

Hi Everyone!...  Yep, I've been missing, awol, hiding.. any verb you'd like to use.  It's our Thanksgiving this coming weekend and there for a while it looked like mom was going to make it to my house for her first holiday dinner with us..ever!  She's just a ferry ride away but.... darn..I'm not going to go into details.  So.. lost my mojo for a bit and went shopping at my favourite store (Groan all you like Nancy and Myrna haha!), Crafty Capers, and decided I was going to distress something!  Here is the result.  They are my first ones so they aren't perfect but.... They are really neat!  My tags will probably end up as bookmarks and may make some up to send over to Vancouver's Children's Hospital in teen cards.
So... Here is the first one...
This first one is done with an unknown stamp I purchased before dinosaurs roamed the earth.  The sentiment is Michael's bargain bin from last month.
On my nifty shopping trip I purchased the sold out Distress Ink Fall Trio!  They sold out in 6 hours on the web site and Victoria has a couple more coming in from a second batch they are doing because of the huge success of the first one.  I bought the last set when I was there and that's what I tend to do... always buy the last one haha!
The Distress trio is made up of three colours that will only come out once a year, .  The edges of the tag were distressed with my 'go to' Frayed Burlap.  The sentiment was stamped with Seedless Preserve and embossed with clear powder.  Mr Pumpkin was stamped with Orange Marmalade.
Here is a look at the 'cracked glass' effect that I tried for the first time....
This second one is more of a gift tag for Christmas. 

This Christmas tag is one that I cut out myself.  It was distressed and the sentiment was stamped with S.U. Next to Navy and embossed.  The snow flakes were stamped with Brilliance Copper and embossed.  Wool from the bargain store was used as the ties for both tags.

Recipe:

Stamps:
Some unknown, Background - Penny Black Letter Background
Snowflakes - Penny Black Christmas Set
Inks:
Distress - Tumbled Glass, Weathered Wood, Ripe Persimmon, Seedless Preserves, Spiced Marmalade

If you have distress inks... play with them!  I'm now in love with these and am going to work on using them with stampscapes!

Hugs,
Sheree

Sunday, 7 August 2011

Eat Your Heart Out Victoria!!

Good Afternoon Chickees!
It's Sunday afternoon and I'm down in the basement for a wee bit posting this because it's soooo hot outside!  When you add the heat to hot flashes.... Let's just say I'd love to fly to Alaska right now and run around with no clothes on!  Haha!  Second thought... I'd probably be run out of there in a hurry!
My DH has come down with a nasty cold and headache.  After I post this I must go purchase some more drugs for him.  I'm planning the funeral for this coming Friday.
My wonderful 'Stamp Eater' dog has taken a liking to my Holey shoes!  It just took me over an hour to find it this time.  Purlita had it in her fort!  Worse than having 10 - 2 year olds around!

Now.. Back to today's post!

I did another shopping trip to my favourite stamping store, Crafty Capers, last Thursday.  This has become a regular thing to do after working in Nanaimo on Thursdays!  The Stampscape stamps were in for the 'Cards for Ethyl' candy, so I picked them up along with a couple of things for myself!  Bad, Bad, Sheree!
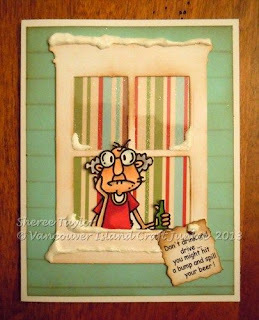
I spotted this stamp a couple of weeks ago and thought I'd better pick it up as it was the only one.  Victoria said it had been there since last year and she'd be so upset if I made something awesome with it... because she didn't have one or sold it at the garage sale or something.

Here is the first card I created. I'm not too sure I'm happy with it because I got stuck with the ribbon.  I'm going to do some more with this stamp and will add the cards to this posting as I complete them!
I distressed the background paper and although it's hard to see it in this picture, it's of old catalogues... maybe even the Sears Wishbook?  Who knows...  I deckled the edges with my Fiskars scissors and then distress the edges before scrunching them up.  The image is embossed in gold which makes staying in the lines a lot easier haha! 
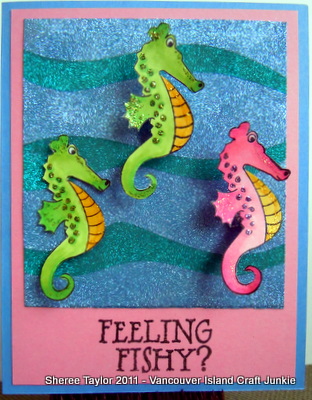
This second card is my current favourite.  It is also embossed in gold and coloured with Copics.  I liked the clean look with this one and the background paper is gold with a medium sheen to it.
In this photo you will see the embossing and now that I have it up on the screen... it shows how I have a hard time staying inside the lines hahahaha!  Better luck next time!
The recipe for the above is:
Stamps:
Stampendous! - Poinsettia Corner
Sentiment - Unknown
Ink:
VersaMark
Copics
Gold embossing powder
Stickles - Sunshine Yellow (kind of looks like roe in the pic??)
Distress Ink Pad - Old Paper
Thanks for looking and I hope you have a wonderful work week!
Hugs,
Sheree