Sunday, 22 January 2012

Hoppity Easter!

Good Afternoon Chicks!
I worked on this Friday night but this is the first chance I've had to post it.  I bought the stamp from Michelle's Scrapbooking and More a while ago and decided to give it a whirl. 
First off I stamped the scene with Distress Walnut Stain as black was too harsh.  Then, coloured the scene with copics.  I hadn't intended to colour as much as I did so I'll try my other idea later on!  When using the Sketch Copics on this I didn't take my time.  Using the brush tip I just started putting colour here and there with large swoops (is that a word?) so it wouldn't look perfect.  That's what I acheived as well.  Actually, my eyes seem to be getting worse all the time and colouring like this is so much easier and I can actually justify my actions haha!  Kind of looks like the colouring on floral greeting cards... the artistic kind.. Not by Hallmark printers!
Once I finished colouring I distressed with Distress Frayed Burlap and blended it into the scene.  Lastly, I used Distress Walnut Stain to darken the edges and blended that in half as far as the Burlap.
I was flipping through my Cricut Carts and found a flourish type of leafy corner on Storybook so cut that out in white and green.  They were both distress with Walnut Stain as well.
 
The recipe is....
Stamp - Northwoods Rubber Stamps Inc.
Papers - Recollections and dp is unknown
Inks - Distress Walnut Stain, Frayed Burlap
Copics
Ribbon - Michaels cheapie bin
Paper Flower - Dollarama (I haven't found them there in a year but am hoping they get more in)
Stickles - Light Pink on tulips
 
Have a wonderful weekend!
Hugs,
Sheree
p.s.  I thought of this before my head exploded Gail L.!
 

Thursday, 19 January 2012

I Love Paris....

Good Evening Everyone!

I put this together last night.  I came close to the idea that was in my head but need to tweek the design a bit more.  Instead of heart brads holding down the corners I would love to find something that would make kewl Victorian photo holders.  Something like that would tie in with the Eiffel Tower nicely especially if it had a wrought iron look without the wrought iron price!  If I find something to use along that line I will post it at a later date!


I started by stamping on a small piece of white cardstock.  It's hard to see in the photo but I used Antique Linen Distress to stamp a background behind the tower.  The leaves and flowers are coloured with distress inks and I went outside the lines with the sponging on purpose.  Next I used a light grey copic and gave PARIS a shadow which also made them stand out more.
The mesh background is from a roll that I bought at the dollar store before Christmas.  It unravels easily but that's alright for this one.  The gold tinsel that is woven into it slides out easily so may just pull it all out next time.  I was thinking that I may distress the weave before cutting it as well.
Lastly, I accented the flowers with pink Stickles.  It made them stand out a lot more!


The recipe is:
Stamps -  Stampendous CRP144 - I Love Paris
               Penny Black 1999L Letter Background
Distress Inks - Wild Honey, Antique Linen, Shabby Shutters
Adirondack Dye Inks - Pink Sherbet
Versa Fine Black
Paper - Staples 110 lb. and unknown
Stickles
Brads
Ribbon - WalMart
Bow Easy

Have a wonderful work week!
Hugs,
Sheree

Just thought I'd share something wierd and funny with you as well.  I occasionally go into Stats to see where my viewers are coming from.  The largest source????  http://www.justforlaughsgags.tv/  I went to this link and found there's nothing there that I can see that would refer anyone to my blog.  Go figure!!

Saturday, 14 January 2012

Stampscapes Tutorial - Morning/Evening Skies

This tutorial is posted on my blog and will be posted on the Create A Scene blog commencing Sunday, January 15th!


Here is a quick tutorial on how I achieve skies in my Stampscapes scenes.  I have had many requests by my blogging friends to do a tutorial for them to learn from.

For these I work on glossy cardstock.  I have found that blending is easier on glossy rather than regular cardstock unless you are using Distress Inks.  The stamp pads used are shown in each photo and at the end of this post I will list the recipe!  When working on glossy card stock I find that Ranger Adirondack dye inks along with Memento dye inks work the best for blending. 

Everyone sees their surroundings in a different light.  This is how I see my skies where I live, (When it's not raining!).  This is one way of colouring the sky.   Just as there are thousands of different scenes shown on the internet, there are thousands of ways to colour your sky.  Always remember that there really is no wrong way of doing things.  We are all artists at heart! 

Step 1:  I lightly tap in yellow along the mountain tops, or along the horizon of the scene.  Don't worry about getting too much yellow in there.  At first it may seem too bright but these dye inks will fade!  When using your stylus, make sure you aren't heavy handed.  Instead of blended colours it will look like coloured footballs all over your scene.

 Step 2:  We are going to tap in the blue for the sky this time.  For this I always start out using Adirondack Aqua or Memento Summer Sky.  Load your stylus with ink and tap in colour starting at the upper edge of the sky and work towards the yellow.  This step will take a few minutes.  These colours are light but appear darker with every layer to add.  For me, this is the boring part!!  It's worth taking your time though.
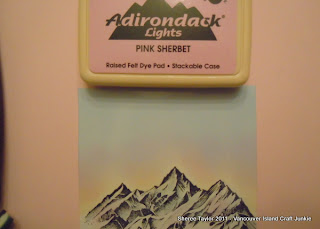

Step 3:  Now is when we start adding the colour!  I tend to use pink and very lightly tap in colour.  Once again, dye inks will fade so don't despair if you feel you've overdone it!  This is also the point where I will add more colour to show sunsets or a sunrise.  As you add darker colours like a fiery fushia or orange, keep in mind that these colours are darker so you'll have to watch how much you add.  Load your stylus and tap on dry, scrap paper to remove most of the ink.  Layers of colour will intensify your sky but too much in a darker hue, too soon, can ruin your beautifully stamped scene!   I am still playing around with incredibly colourful sunrises.  Whenever there's a clear morning I look to the horizon when out with the dogs.  Yes, when there's a beautiful sky to take in... I put everything else on ignore!  haha!


The photo above shows how dark the colours are when I've finished my sky.


This next photo shows just how much the sky lightens when sitting overnight!  If you find it's too light, now is the time to add more colour.  Also, I always put a touch of colour from the sky onto the face of the mountain.  I added a bit more in this shot so you would be able to see it but normally add just a touch.

I also put my Stampscape scenes together by building them around a sentiment I want to use. Sometimes just one or two stamps will do the trick so don't ever feel pressured to create a scene that always has one of everything in it!


Sky Number Two!

Okay.. this doesn't look like much but I wanted to show you how to stamp the clouds as it took me a while to figure this tip out.


The sky above looks like it would be hard to do but in reality... it's easy peasy!! 

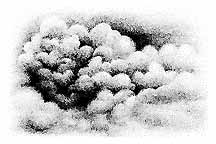
Here's what the rubber Stampscapes stamp looks like.

This is what the image of 018E Cloud Cumulus looks like in black and white.  I imported this image from the Stampscapes web-site.

To achieve the sky that I stamped in the photo, load the stamp with Distress Ink Walnut.  Now don't stamp right away!  Use a dry paper towel and gently dab along the edges of the stamp so the image will feather out.  I also lightly dab the dark area in the middle of the stamp because I wanted this piece to look like an aged photo.  Also, if you don't dab the edges of the stamp you will get a rectangle of clouds that will be hard to match up. 

If you are creating a sky on a larger piece all you have to do is keep stamping, but change up the stamp by turning it upside down here and there as well.  Always remember to feather the inked edges with a dry paper towel so everything will blend together nicely.

There you have it!  Simple skies the way I do them!  I'm hoping to find out how to colour the Northern Lights one of these days.  They are gorgeous!

Have a wonderful weekend and Happy Stamping!

Hugs,
Sheree

Inks used in this tutorial for the sky...
Ranger, Adirondack Dye Inks:  Aqua, Lemonade, Pink Sherbet
Memento Dye Inks:  Summer Sky
Distress Ink Pad:  Walnut

Inks used to finish colouring the mountains on the finished piece for the tutorial:
Distress Inks:  Frayed Burlap, Gathered Twigs, Iced Spruce
Memento Dye Inks:  London Fog

Stamps used on finished piece used for the tutorial:
Stampscapes 188F - Rocky Peaks
Stampscapes 302A - Gulls

ColourBox Stylus
Ranger Distress Applicator

PS ...  Don't forget to keep checking our challenge blog Create A Scene for more tutorials done by incredible artists from our design team.  Become a follower and enter the challenges while you're at it!
PPS ... I just noticed that I forgot to trim off the bottom of the scene because I wasn't going to stamp tree tops in front of the mountains... OoooopS!!

Monday, 9 January 2012

Lacey Valentine

Good Evening Chicks!
 
This is my first attempt at a Valentine card this year.  The lighting isn't that great, along with my photography skills but.. will have to do!
There's no sentiment on the front as it was too busy already.  I found a beautiful verse on the net and will add it to the inside instead.
For this I used the Cricut for the heart, CBug for the embossing, punches for under the ribbon, the flowers and twiggy things, Smooch on the heart and bling from the dollar store.   The ribbon was from my stash and I think I got that from my cousin when she was weeding out her sewing room.
There you have it!  Just a quick one tonight.  Hope you all are having a wonderful start to the week!
 
Hugs,
Sheree

Saturday, 7 January 2012

Birthday Card For My Good Friend...


Good Morning Chicks!

It's finally the weekend!  A good friend of mine is having a birthday this Sunday so I whipped up this card last night to take along with a beautiful floral arrangement.

I've had this beautiful dahlia stamp in my file for quite a while now and am so glad I finally pulled it out!  The flower was stamped in Regal Rose and embossed with clear embossing powder.  Using Copics, I added some dimension to the flower but it was done lightly so as not to overpower the flower itself.  I found a piece of pink cardstock that matched perfectly so it must  be a Stampin' Up! piece that I've had buried for a long while.  The sentiment is also Stampin' Up! and is embossed in the most gorgeous gold that you aren't able to purchase anymore.

Here's the recipe!

Stamps:
Dahlia - Stampendous Jumbo Dahlia Set
Sentiment - Stampin' Up!
Ink:
Regal Rose - Stampin' Up!
Embossing Powder:
Clear - Hero Arts
Copics
Paper:
Stampin' Up!?, Staples 110 lb. cardstock white
Butterfly:  WalMart

Thanks for looking and happy stamping to all you crafters!

Hugs,
Sheree

Wednesday, 4 January 2012

Stampscapes - It's The Little Things

Good Morning Chicks!

Well it's another day of wind and rain here on the island.  Spring just can't get here quick enough now.  I'm getting antsy about working in the mud!

This is a very easy scene I came up with last night.  I actually had six of them done in just over one hour!

First off, I love my little sentiment that says.. it's the simple things, that I purchased from Michelle's Scrapbooking and More web store.  I took the word simple and ran with it!

Everything on this scene was inked with one colour... Distress Walnut (key word - simple).  The distressing was done with the same and then using my nail I roughed up the edges and mounted on dark brown cardstock.  The rest is self explanitory I'd say!  Here's a closeup of the scene itself!


The recipe is:
Stamps - Stampscapes
048E  Lakeside Cove
018E  Columbus Cloud
166A  Row Boat
196F  Pine Tree

Ink - Distress Walnut
Papers - Recollections & Staples
Dots - Dollarama

Thanks for looking and have a wonderful week!

Hugs,
Sheree

Valentine CAS Card

Good Morning Chicks!

This is a quick post this morning.  The Sunday CAS challenge at The Outlawz for this week is to have a white background.  Here's my take on the challenge!

Stamp:  Penny Black
Sentiment:  Unknown (cheapie bin at Michaels)
Ink:  Versafine Black
Bling:  Dollarama
Score Board
Clean embossing powder

Have a wonderful morning and I'm now going to post my new Stampscape!

Hugs,
Sheree